
BY FRAMELIFTER · Updated
10 Real Estate Photo Mistakes That Cost You Showings (and How to Fix Each)
Most listing photos aren't bad because the photographer lacks skill — they're bad because of a handful of specific, repeatable habits: shooting from the wrong height, leaving a window blown out, grabbing the wrong lens. Here are ten of the most common ones, what each looks like in practice, and exactly how to fix it.
A CLOSER LOOK · FRAMELIFTER
See what a useful edit changes.
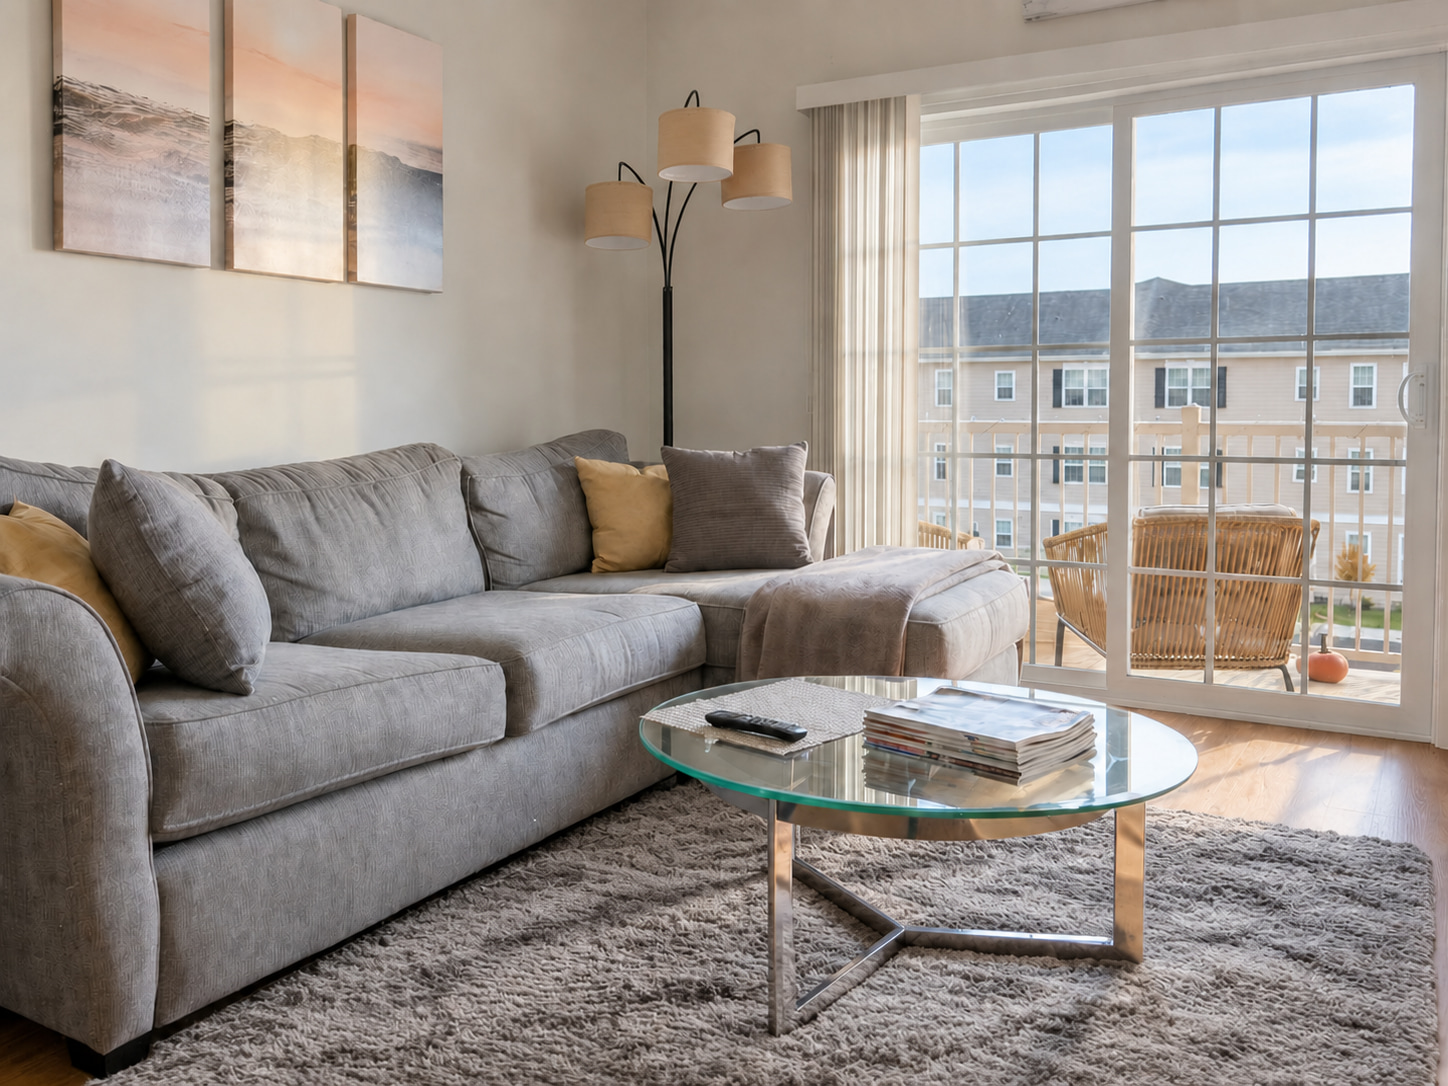
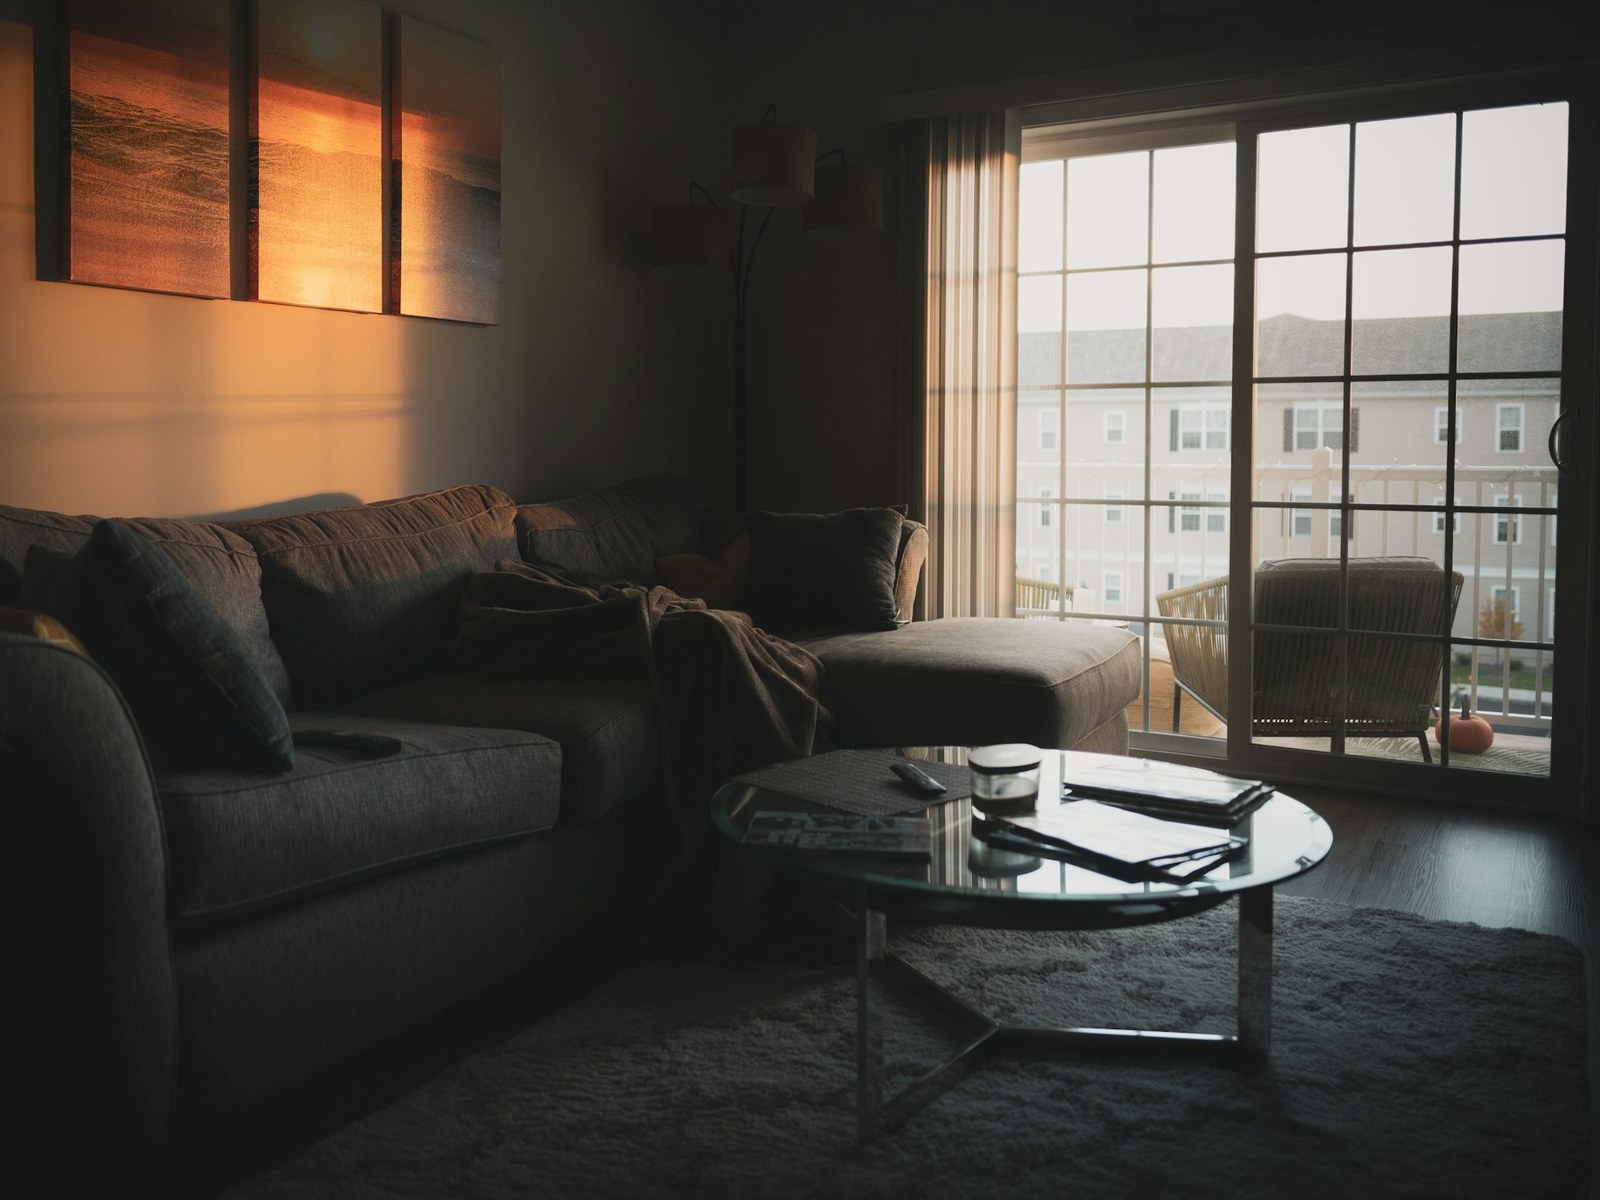
Compare the light on the sofa, the wall color, and the detail around the patio doors. This example also includes tidying; a lighting correction and a cleanup are different tasks.
- A brighter room with readable shadows
- Neutral color without washing out the materials
- Review furniture, surfaces and the outside view
Free watermarked enhancement preview. No account or credit card needed.
Jump to a section
Edit, reorder or reshoot?
| Problem | Next action | Why |
|---|---|---|
| Sharp but dim room | Try an exposure and color edit | The source may contain usable shadow detail. |
| Tilted doorframes | Level the camera or correct modest perspective | Heavy correction crops away parts of the frame. |
| Good gallery, weak first image | Choose a clearer cover | Editing every file will not fix the order. |
| Blur or missing room coverage | Take another photo | A stronger source is more reliable than fabricated detail. |
| White window with no view recorded | Reshoot or use a genuine darker bracket | An invented view misrepresents the property. |
1. Shooting from Standing Eye Level
Hold a phone or camera up to your eye while standing and you're shooting from roughly 5.5 to 6 feet, angled slightly downward at the floor. That downward tilt compresses the vertical space in the frame — ceilings look lower, rooms look shorter than they actually are.
The fix: shoot from chest height, around 4.5 to 5 feet, with the camera held level (not tilted down). This is roughly the height a tripod set to its mid-range lands at by default, which is part of why photographers who use tripods tend to avoid this mistake without thinking about it. If you're shooting handheld, consciously lower the camera and level the horizon line in the frame before you shoot.
2. Vertical Lines That Aren't Vertical
Doorframes, cabinet edges, and window frames are vertical in the real room. In a photo, if the camera is tilted even a few degrees up or down, those same lines start converging toward the top or bottom of the frame — the classic "keystoning" effect. Most viewers can't name what's wrong, but they register the photo as slightly off, amateur, or even a little dizzying.
The fix: use a level — many cameras and phone camera apps have a built-in electronic level overlay, or use a small bubble level on a tripod's hot shoe. If you shot without one and the lines are already crooked, Lightroom's Upright tool (Transform panel, Auto or Vertical) corrects perspective distortion in a couple of clicks for most interior shots.
3. Blown-Out Windows
Point a camera into a room with a bright window behind it and expose for the room, and the window turns into a flat white rectangle with no view, no sky, no trees — just blank white. It's one of the most common exposure mistakes in real estate photography because it's the natural result of a camera's auto-exposure trying to average a high-contrast scene.
The fix: for rooms with strong window light, shoot a bracket — 3 to 5 exposures at different settings — and merge them, which is the standard HDR workflow (see our full guide to HDR real estate photography for camera settings and merging steps). For rooms where the contrast isn't extreme, a single shot corrected with AI photo enhancement can recover window detail well enough. Once a window is fully blown out in the source file with zero data left, though, no editing technique after the fact brings back detail that was never captured.
4. Cluttered Counters and Surfaces
Mail stacked on the kitchen counter, toiletries lined up on the bathroom sink, dish soap and a sponge by the faucet, cords draped across a desk — none of it is a big deal to live with, and all of it distracts in a photo. Buyers scanning a listing are trying to picture themselves in the space; someone else's stuff on every surface makes that harder.
This isn't about deep cleaning — it's specifically about horizontal surfaces that sit in frame: kitchen counters, bathroom vanities, nightstands, dining tables. Clear them down to at most one or two intentional objects (a bowl of fruit, a single plant) before shooting each room, not just once at the start of the shoot.
5. Wrong Lens, Too-Wide Distortion
Ultra-wide lenses make rooms look bigger in a thumbnail, which is exactly why they get overused — and exactly why buyers have gotten good at spotting it. Past a certain point, walls start to bow, straight lines curve near the frame edges, and a small room reads as obviously stretched rather than spacious. It also sets up a bad in-person reveal: a buyer who shows up expecting the room from the photo is disappointed by the real one.
The fix: stay around 16-24mm full-frame equivalent for most interiors. On a phone, that means using the main camera rather than the 0.5x ultra-wide lens for anything except rooms too small to shoot any other way. If a room requires an ultra-wide to fit in frame, correct the barrel distortion afterward rather than leaving it as-is.
6. Dark, Underexposed Rooms
This is a different problem from blown-out windows — it's a room that's dim and muddy throughout, usually from relying on a camera's auto settings in a room lit only by a couple of lamps, or from shooting at dusk without adding any light. The photo isn't fighting a bright window; it's just underlit everywhere.
The fix: open curtains and use bright indirect daylight. Compare room lights on and off, and avoid relying on later white-balance correction to solve incompatible light sources. Use a tripod and a longer exposure for a stationary room when practical; check motion, noise and highlights in the actual file. For photos already shot dark, our guide to fixing dark real estate photos covers the editing side in more detail.
7. Defaulting to Portrait Orientation
Phones default to portrait when held naturally, and it's an easy habit to carry into listing photos without thinking about it. The problem: MLS grids, Zillow thumbnails, and most listing platforms are built around landscape images. A portrait photo either gets letterboxed with gray bars on the sides or cropped awkwardly to fit, and it shows less of the room's width than a landscape shot of the same scene would.
The fix: rotate the phone to landscape as the default for every interior and exterior shot. Portrait has a legitimate use for tall features — a two-story foyer, a stairwell, a narrow hallway with high ceilings — where the vertical dimension is the actual subject. It just shouldn't be the default for a full gallery. Once your shots are the right orientation, our free MLS photo resizer gets them to the right dimensions before upload.
8. Ignoring how your phone handles HDR
Some phones handle HDR automatically, while others expose a control. Take a test shot and inspect the room and windows instead of assuming a switch is available. If highlights are still clipped, lower exposure, change the angle or return in softer light.
For a scene beyond the phone’s range, use a controlled bracket workflow or a photographer. Our iPhone guide covers the controls that are actually available.
9. No Wide Establishing Shot
Some listings jump straight into close-ups — a shot of the kitchen island, a shot of the range, a shot of the sink — without ever showing how the kitchen fits together as a whole room. Buyers end up mentally reassembling the space from fragments instead of understanding the layout at a glance.
The fix: for every major room, get one wide shot from a corner that shows as much of the room and its connections to adjacent spaces as possible, before shooting any detail or feature shots. The wide shot orients the buyer; the detail shots support it. Skipping straight to details without an establishing shot is a common reason galleries feel choppy even when every individual photo is technically fine.
10. A Weak First Photo
The first photo in a listing isn't just the first photo — it's the thumbnail shown on search result pages, map pins, and saved-search email alerts across Zillow, Redfin, and the MLS itself. Buyers decide whether to click into a listing largely based on that one image, before they've seen anything else.
A common mistake here is leading with something technically fine but forgettable — a straight-on shot of the front door, or an interior shot that doesn't clearly say "this is a nice home." Another version of the same mistake: leading with a portrait-orientation or poorly lit shot because it happened to be the first one taken that day.
The fix: choose the strongest single photo in the set deliberately, after the shoot — usually a well-lit exterior front view or the best-looking interior room — rather than defaulting to whatever was shot first chronologically. It's worth reviewing the full set specifically for this decision rather than assuming the file order is right.
Fixing These After the Shoot
Some of these mistakes — camera height, orientation, lens choice, shot order — only get fixed by reshooting. But exposure problems, dark rooms, and color casts are fixable after the fact without a second visit to the property. Our full real estate photography guide covers the shoot side end to end if you're starting from scratch. For photos you've already taken that just need exposure, color, and clarity fixed, AI enhancement handles that without needing the raw files or a trip back to the listing.
Frequently asked questions
What is a useful first check for a room photo?
Check whether the camera is level and the doorframes are straight. Chest height is a useful starting point, but adjust the position to the room and the composition rather than treating one height as a rule.
Why do vertical lines matter in listing photos?
If the camera tilts even slightly, vertical lines like doorframes converge toward the top or bottom of the frame instead of running straight. It reads as an amateur, slightly warped photo even when viewers can't say exactly why. Keeping the camera level, or correcting perspective afterward, fixes it.
Should real estate photos be portrait or landscape orientation?
Landscape, as the default. It matches how MLS grids and listing sites display thumbnails and captures more of a room's width. Portrait has a place for tall features like a stairwell, but not as the default for a full gallery.
How do I fix a blown-out window in a listing photo I already took?
If the window is fully white with zero detail, there's no data left to recover. If there's still faint detail, exposure recovery or AI enhancement can often pull it back. Going forward, expose for the window or shoot a bracket for rooms with strong window light.
What lens or focal length should I use for real estate interiors?
Roughly 16-24mm full-frame equivalent. Wider than that and straight lines start to bow near the frame edges. On a phone, avoid the ultra-wide camera for interiors unless the room genuinely requires it.
Does the first photo in a listing actually matter that much?
Yes — it's the thumbnail shown in search results and map pins before anyone clicks into the full listing. A weak first photo means buyers scroll past without ever seeing the good photos inside.